Monday, February 29, 2016

Trash it

So a little easy sewing hint… You know those loose ends when you knit, or sew that you place down on your work space. You know the trash that you then forget was there so don’t throw it in the trash like you said you would. Am I ringing any bells? Let me guess you have proceeded to drag your project across it, it landed on the floor and you have since found it in every part of the house. You may have even found it well… at your “day job” that you only have to feed your textile addiction anyways. Well I may have found something that will avoid well the trash getting away.

I was visiting my mother’s knitting group and one of the members had a very clever “yarn bowl.” She took the little container that the Cherry Tomatoes came in and had her yarn ball in it. “Brilliant” I thought till I realized all the yarn balls I work with are too big. However in a fit of brilliance it fits the scraps. I just fill it up and when it is full I toss it into the trash or my doll stuffing pile. No more (ok less than normally) yarn and thread strands floating around my house. Works great, unless I knock it over again but even then minimal thread escapees make it to other parts of my home and work.

One by my spot on the couch


Tissue boxes work great too.

One by each Of my sewing machines


I keep one by all of my knitting spots, and sewing spots.  

Tuesday, February 23, 2016

Keep it clean.

I would like to introduce you to a very well, rather forgotten piece of garment history. When we talk about clothing through the ages, we discuss dresses…, hats…., shoes…, socks…, adornments, (jewelry and lace) and our unmentionables. The garment however that we so woefully forget until we need it and Now it is to late to do us any good, is the wonderful, the ever changing, but ever so useful is the apron.

No I haven’t lost my mind. We really have forgotten it. I cheer when I see an actress put on an apron in a scene. Why do we need it? Or more correctly why has it survived so many centuries. From coverings of one’s skirt to some with covering of one’s whole outfit it had one purpose to keep one clean. Cloth though relatively inexpensive today was once one of the most expensive things someone could own. In a probate record of more than one of the original settlers to early New England a suit could be listed as 10 pounds. The average yearly income in England at the same time for someone of the middle class which the early settlers were, was about 20 to 40 pounds a year. If your clothing cost that much you would protect it too. In paintings it is very rare to find an apron on someone of the upper classes. In pictures/paintings of the middle and lower classes it is almost guaranteed you will see an apron. In some case even some on men. Bakers, blacksmiths and even the occasional carpenter or thatcher is seen with a scrap of cloth dangling at his hip. At work we liked to call them manprons.

David Teniers II 1610-1690 sharpening the stone... look aman wearingan apron


From cooking, gardening, and cleaning this fabric sometimes which was just a simple rectangle protected ones clothing from being spoiled and ruined by stains. A house wife could reach down and use it to pick up a hot frying pan or take a hot pot off of the fire. Though at my modern jobs I can’t use the apron to clean of my hands I have done it in my historical costumes. It doesn’t protect your clothing when you sit down but I have seen my dirty apron after a day at work. I am glad that it wasn’t on my wool skirts. Those are harder to clean.

Vanezo Campi Kitchen 1580
Love the detail of the woman in peaches apron. Two apron strings


So here is to the apron my you never be forgotten, I would like to stay clean.

Apron avalible for sale on my Etsy, Etsy.com/shop/ GrandmasTools


Dirt, if you are mother you know the pains, if you are child you well know the taste and if you are an apron congrats you did your job if you know dirt. 

Wednesday, February 17, 2016

Four basic stitches

In and out it goes leaving its guts behind. What is it? (a sewing needle)

There are 4 basic hand sewing stitches that every seamstress needs to know.

The first is a basic stitch. It is really easy; just draw your needle in and out at equal distances. If you want to gather far apart stitches are the better.


The next stitches are over lapping, good when you want a tight seam so you don’t have a gap in your seams. On the top your stitches touch on the bottom they overlap.


Then there are whip stitch this is perfect for hems. It should be hidden working close together, catching the cloth along the inside of the fold of the hem and a few stitches of the front of the garment.


Filially the blanket stitch use this stitch when you want to help seal up raw edges along the side of a garment or on button holes. For this stitch insert needle in to the top wrapping the thread back around to the top while putting the needle through the loop. Keep as tight and even as possible. 


Tuesday, February 9, 2016

Spags's a changing world "A penny for your thoughts."

Do you remember Show and Tell in school? You would bring something in and tell your classmates all about it. Usually someone ended up bragging about the new doll they got or the new hot wheels. The only one I can remember doing was in Kindergarten and it was about Spags. Now I am sure an extremely small number of my readers will know what Spags’ was but I’m sure everyone has had a place like spags, be it Ames or a small mom and pop shop.

In the 1930s Spags was a store that carried a little of everything. Spags’ wasn’t out to make it rich but out to make sure people could get what they needed whether it was a 4x4 piece of wood
or clothing. My family had been going there since it opened and we still have things we purchased from there. Books, car parts, wood, sporting goods, clothing, uniforms, cooking, food, and more then I can remember. It stretched through at least 3 buildings, and if someone tells me they are from the area where it use to stand I always ask do you know about Spags’. If they do they are as surprised to know someone else knows about Spags’. If they don’t then they aren’t from there, they are new there because that store was an icon to that area.


Things change though. Spags’ died and the store died with him. We went once after his death, I remember it seemed to had lost a bit of what made it “Spags’”. It has been years since I have stepped in that store, (I think it closed when I was in middle school) but I still remember the place and have a hard time finding a store that could even copy the charm and the “everything” under one roof of the place. The world is changing and more stores are going under, it is getting hard no matter what stores say to find a real bargain. Things break and $5.00 doesn’t get you what it used to. Bargins today seem to be as cheap as what you paid for them. I don’t know what my Grandmother paid for the Spags’ measuring cup but the numbers haven’t worn off and it hasn’t died on me yet. (Though if it breaks at this point, it is on my clumsiness not it’s quality.) You get what you paid for and looking forward I may not always find what I am looking for but I will keep in mind that fact as I resew buttons onto every shirt I go and buy rather than make. 

Tuesday, February 2, 2016

The smell of freshly made bread

The smell of fresh baked bread is enough to awaken the senses. Bread bakers around the world create the mystical scent that seems to waft around like one of those cartoons where the sent runs right up under your nose and you seem to drift towards it finding it, buying it, eating it and then wishing you hadn’t eaten it so quickly. I thought I would share with you one of the bread recipes I use. I have altered it slightly from the one you find in Mother Earth News adding a slightly different mixture of flour.
Hands on time: Prep 5, let sit overnight (12 -18 hrs) bake 45 mins.
You will need a large bowl and either a Dutch Oven or a Pizza stone
Ingredients:
¼ tsp of active dry yeast
1 ½ C. Warm water (about blood temp) (put your finger under the water and the water should feel no colder and no warmer than your finger.)
1 ½ C. All-purpose flour (plus extra for dusting
1 ¼ C. Whole Wheat Flour
¼ C. of Rye Flour
1 ½ tsp salt

Step 1: In large bowl mix the yeast and water. Add flour and salt stirring until well blend and is sticky with a shaggy appearance. Cover bowl with plastic wrap and let sit for at least 8 hours at warm room temp. Around 70 degrees. If like me you keep your home cooler you should let it sit longer.


Step 2. I tend to do my first fold in the bowl because it is rather sticky. Lay a dusting of flour on the top and pulling up on the sides fold it over the top. Repeat on each side and recover, letting sit for 15 minutes- hour. The second fold dust a work surface with flour and spread thinly the dough over your surface. Once it spread out fold into thirds like you would a comforter. Return to bowl and let sit again. Fold again 1 to 2 more times until the dough doesn’t tear when you spread it out and sort of springs back into itself.


Step 3. Using just enough flour to keep the dough from sticking to your work surface or hands gently but firmly fold the bottom into the top creating a crease on the top. Turn it over and shape it into a ball. Keep the bottom of the bread on the surface to twist out the seam you created. In a bowl have a clean dish towel coated with flour, wheat bran or cornmeal ready and place your bread inside and cover it for another 1 or 2 hours. When it is ready, the dough will have doubled in size.


Step 4: Preheat the oven to 475 with a 6-8 inch quart Dutch oven or pizza stone before bread is ready (10-30 minutes depending on your oven). When dough is ready carefully place your dough in your pot or on your stone by flipping it carefully out of the cloth. If it loses a bit of shape when you do this that is alright. With a sharp knife make a few cuts in the top so it spreads out more evenly.

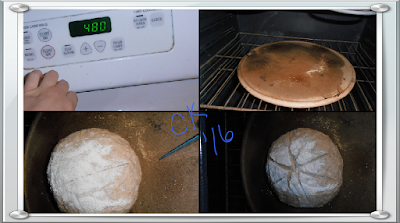
I do it at 480 because my oven heats a little low.


Step 5: If you are doing it in a Dutch oven cover and bake for 30 minutes. Remove lid and bake another 15-20 minutes until the dough is a nice brown. If on the stone bake for 20-30. Remove from the pot or stone and tap the bottom if it sounds hollow it is done. Place on a rack for at least an hour before enjoying. 


I enjoyed mine with a nice bowl of beef Stew. Makes great grilled cheese too.

Pottery from Plimoth Plantation Potters
Pizza stone mentioned in blog A bakers gonna bake February 10, 2015